
Unity3D Art Tips and Tricks feat. Blender 3D
/Having worked within the confines of Unity3D for half a decade, I’ve garnered a bit of helpful information along the way that, with any luck, will aid some of you along your own journey. Without further ado here they are:
1. Using Unity's Default Toon Shader:

STYLIZED TOON-SHADED OUTLINES
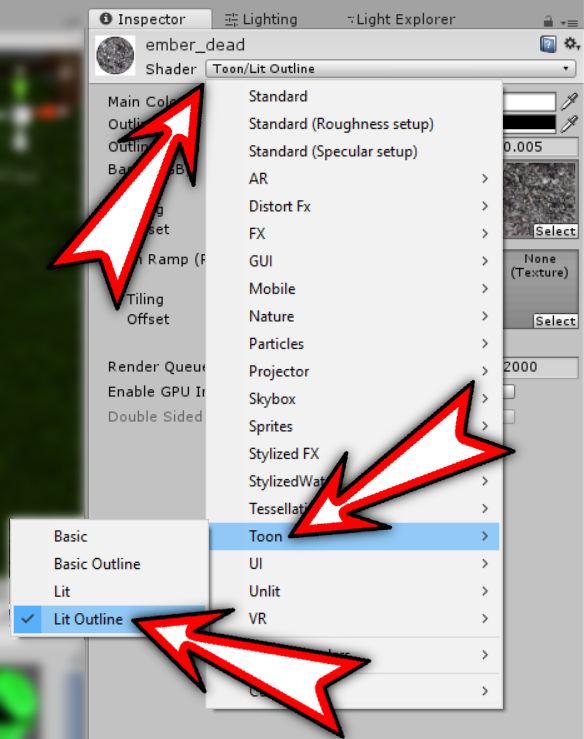
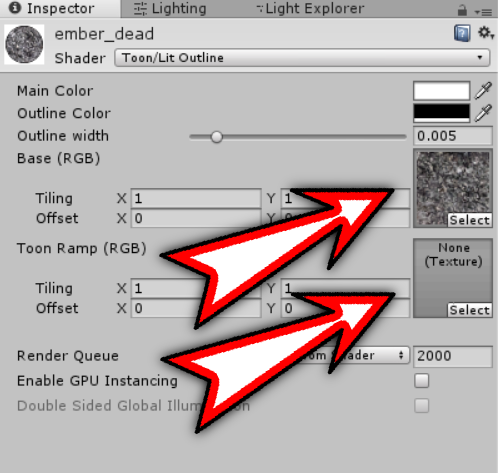
If you’re interested in creating a stylized, cartoonish look right out of the box, then you can easily use the built-in Unity3D Toon shader. It minimizes all of the parameters of the Standard Shader and whittles them down to various color and Ramp sliders, and two texture maps. The Toon shader allows you to choose between a high-contrast, low-fidelity “Lit” version, and an “Outline” version which draws a black outline around the visible edges of the shaded object.
One important thing to note about the “Toon - Outline” shader is that you will need to be sure your imported model has the “smooth” modifier applied to the faces. If your model isn’t “smooth” in export from your 3D architecture, then the Outline shader will break the black line on every vertex, like this:

BROKEN OUTLINE ON VERTICES
In Blender 3D, smooth the object like this:

SMOOTH THE OBJECT
... then export. When the Outline shader is applied, the black outline will smoothly transition from vertex to vertex.
This is how it should look:

PROPER OUTLINE
Not this:

IMPROPER OUTLINE
2. Adjusting Unity's Light Sources:

LIGHTS AND AMBIENCE
Light sources and shadows are very important when attempting to create mood and ambience in your environment. Light Mapping and Baking aside, of utmost importance will probably be the number of lights that you will have at one time in any given scene. Keep in mind, always, that per-pixel lighting like Point and Spot lights are expensive for the player’s CPU to render, and the more real-time lights simultaneously lighting a scene, the heavier it will be on your Framerate. But you can adjust the number of simultaneous lights in your Project Settings:

EDIT -> PROJECT SETTINGS -> QUALITY
Unity’s default is usually 4 simultaneous real-time lights, but I usually pump that number up to about 10, and try to keep the average down at around 6-8 lights in any given scene, only using my new maximum for rare ambient purposes, and even then I will be sure to turn them off as quickly as possible, to save CPU cycles. You can adjust the number of maximum lights here:

PIXEL LIGHT COUNT
An important tool in your Unity toolbox for lighting is your Light Explorer. You can access it via the Window, Lighting, Light Explorer selection in the Menu, like this:

This window shows all of your current lights in your scene and you can view their number and their data in real-time while you’re testing the scene. Here I have a single Directional Light in the entire scene (acting as the Sun), and the Light Explorer is showing me its data in real time.

3. Tweaking Unity's Audio Sources:

2D audio is mostly self-explanatory, but 3D audio brings a whole new dimension to the experience. When dealing with 3D audio sources, here are some basic tips to consider.
A. Change Spatial Blend to “3D”: When you make a new sound or music using the “Audio Source” script, always be sure to set the “2D-3D” parameter to “1.”

SET SPATIAL BLEND TO "1"
Leaving it at “0” tells the engine that the sound should be treated as a 2D sound effect and that distance should not matter. No matter how far away the player/camera is from the object, the player will hear the sound everywhere in the scene. Setting it to “1” tells the engine that the sound should take distance into account, and it will adjust its volume accordingly.
B. Adjust Doppler Effect: Set Doppler Level to “0” if you don’t want to hear the ambulance-like waning and waxing sound as you move closer, further, or passed an audio source. Play with this parameter to hear what I’m describing.

ADJUST DOPPLER LEVEL
C. Adjust Rolloff graph: The audio source’s Volume Rolloff parameter is the volume of the sound based on distance from its source, shown in graph form. Sometimes it’s difficult to get this parameter just right for your purposes, so be sure to test some varied methods. I always start my Volume Rolloff with Linear, and then add a central node by double-clicking the middle of the graph (Linear will change to Custom Rolloff here), and moving the arms to create a smooth but accentuated rolloff curve. See here to witness what I'm talking about:

This gives a nice effect that keeps the sound faded in the distance but gives a higher, more pronounced volume close by. Game design elements and mechanics can be utilized more with this fictional rendition of sound travel. For instance, if you want to alert the player to a hidden item only when she’s near it (say, if it’s hidden in some bushes, or behind a wall close by) but outside of a certain radius the sound is varying degrees of faint. Play with this and see what you discover. Be sure to keep your eye on the Max Distance and adjust it accordingly, depending on how near or far you'd like your player to hear the Audio Source.
That’s all for this post. I hope the shader, light, and audio tips will be helpful to you! Good luck and good dev’ing!
~Anthony